How to Make Maple Syrup…

Printed versions of this guide are available upon request!

Maple season is a great excuse to get friends and family together and enjoy the fresh air. We are sure you will find the process of making maple syrup both fun and rewarding.

Start by gathering the tools you will need using the checklist below. Most of the tools you need can probably already be found in your home!

TABLE OF CONTENTS

  1. Things you will need
  2. When is maple season?
  3. How to identify a maple tree
  4. Tapping
  5. Collecting
  6. Boiling
  7. Filtering
  8. Bottling
  9. Cleaning

THINGS YOU WILL NEED

For Tapping

  • Maple trees (See below for helpful tree ID tips)
  • Drill with a drill bit that matches your size of Spouts
  • Hammer
  • Smoky Lake Beginner Tapping Kit (Includes reusable Stainless Steel Spouts, Wind Resistant Bag Holders and Sap Collection Bags w/gallon markers)

For Collecting Sap

  • Large, clean buckets for sap storage (TIP: Bakeries and cheese factories often get their ingredients in large, food grade buckets. Give them a call. They  might let you have a container when they are finished with it.)
  • Strainer (For filtering out debris)

For Boiling

  • Maple evaporator pan OR large lobster pot OR turkey fryer
  • Hydrometer and Test Cup (For testing your syrup’s sugar density)
  • Propane Burner and Stand OR Campfire with cooking grate
  • Canola oil OR butter (TIP: This is NOT an ingredient of pure maple syrup. If your sap suddenly foams up and threatens to overflow the pot while you are boiling, add ONE DROP to bring it back under control. Remember, just ONE little drop is all it takes.)

For Filtering

For Bottling

For Cleaning

  • Clean rags
  • 50/50 solution of vinegar and water

Infographic
Above freezing during the day. Below freezing at night.

WHEN IS MAPLE SEASON?

Sap flows during the freeze & thaw cycle of Spring. Temperatures should be above freezing during the day and below freezing during the night.

In Northern states, this typically happens in March. To the south, it can occur months earlier.


Maple Tree Bark
Bark of a mature maple tree

HOW TO IDENTIFY A MAPLE TREE…

  • Straight trunks
  • Usually no branches on the bottom 2/3 of the tree
  • Twigs grow directly opposite each other on a branch (Not alternating position)
  • Bark often has lichen growing on it
  • Bark is made up of vertical strips
  • Bark is a greyish brown
  • Granted, the maple trees won’t have too many leaves on them this time of year, but a maple leaf’s main vein start at the leaf stem. One main vein divides each lobe.

TAPPING

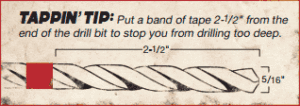
Find a maple tree whose trunk is at least the size of a dinner plate. Drill a single hole, up to 2-1/2″ deep. (NOTE: Make sure the size of your drill bit matches the size of your spout. The most common size spout is 5/16″.) Keep the drill straight or slightly down pitched. If the tree has been tapped in the past, avoid drilling near old tap hole scars.

Use your hammer to gently tap the spout into the hole. It will make a slightly different “thunk” sound after it is seated. Don’t pound or force the spout farther into the tree than necessary or you could crack the trunk. (If you are using Smoky Lake Stainless Steel Spouts, the Depth Assist line should still be visible.)

Tapping Tip: Know your spout

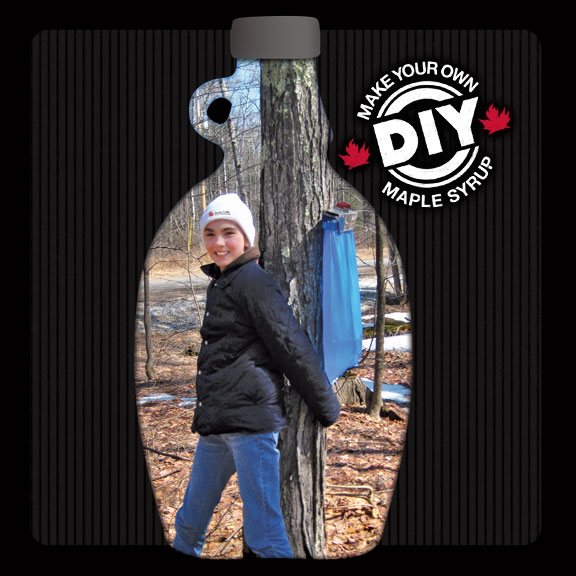
Attach a container to the tap. You could use a milk jug, ice cream bucket or a bag and bag holder as shown in the photo here.

Beginner Tapping Kits available from Smoky Lake.


COLLECTING

Merna Brown from Stonebriar Farm in Dunvegan, Ontario, Canada


Gather the sap from each tree. Use a strainer to remove any debris that may have fallen into the sap. Also, remove any large ice chunks. You can store the sap up to 7 days as long as you keep it cold.

About the photo: Merna from Stonebriar Farm in Ontario uses nostaligic, metal buckets to collect sap from each tap. Now she is combining the sap from the metal buckets into a few food safe, plastic containers to transport it back to the house for boiling. The metal buckets will stay at the tree so that they can continue collecting more sap for boiling on a different day.


BOILING

Boiling will caramelize the sugars in the sap, as well as remove water from the sap via steam. You need to remove enough water to achieve 66.9% sugar density. If your syrup is not dense enough, it will spoil faster. If your syrup is too dense, crystals will form at the bottom of your containers.

Add at least 1–2″ of sap to an evaporator pan (or large pot) and bring to a boil. It’s best to boil outdoors due to the large volume of steam.

NEVER LEAVE UNATTENDED AT THIS STAGE. Continue to add more sap to your pan to maintain your depth. Otherwise you could damage both the pan and the syrup. Add ONE DROP of canola oil or a TINY SLIVER of butter to the pan if the sap suddenly starts foaming up.

Use a hydrometer to test sugar density (measured in BRIX). When you are getting close to 66º BRIX or if you are running out of sap, move it to a smaller pot. You can fine tune your syrup’s density on your stove top.

Beginner Density Kits available from Smoky Lake.


FILTERING

When maple syrup is boiled, a grainy sediment called “sugar sand” develops. Filtering will remove sediments and add beautiful clarity to the syrup. You can filter using cheesecloth or coffee filters, but If you are considering making maple syrup in future years, we recommend using a reusable filter material called “orlon”. The orlon cone filter shown here is a common style used by hobbyists.

Beginner Filtering Kits available from Smoky Lake.


BOTTLING

A bottle of maple syrup

Bottle the maple syrup at about 180º – 190º F. Do NOT overheat the syrup or you will create sugar sand in the syrup and you will have to start over with filtering again. Wear rubber gloves to protect your hands from the hot syrup. Fill the canning jar—leaving a little air at the top—and tighten the lid. Lay the jar on its side. The hot syrup will neutralize bacteria inside the lid and bottle. Refrigerate your maple syrup after opening. This will discourage mold from growing on the surface of your syrup. Try topping ice cream with your new maple syrup! Use it as a marinade or mix it into baked beans! Find hundreds of recipes at pinterest.com/smokylakemaple.

Blueberry Maple Yogurt
Maple Syrup Milk Shake
Grilled Salmon with Maple Lime Glaze
Maple and Lime Glazed Salmon
Maple Beets and Goat Cheese Salad
Maple-Roasted Beet and Goat Cheese Salad
French Toast with Peanut Butter Maple Syrup

CLEANING

When you see the buds forming on the trees, this signals the end of the maple season. Pull your spouts out of the trees and boil them in water to disinfect. Do NOT plug the hole in the tree.

Rinse all other equipment, including reusable filters, with hot water. Do NOT use soap/detergents (they can leave residue) on reusable filters. Also do NOT wring dry (it breaks down the fabric fibers). Store all equipment in a clean, dry, odorless location.

Soak pans in a solution of 50% household distilled vinegar and 50% hot water to loosen sediment. Then spray clean with a hose. More details in our CLEANING SUPPORT GUIDE.


  • Beginner Brochure – Do It Yourself

    Beginner Backyard Sugaring – How To Make Your Own Maple Syrup

    $2.00